
Day ten: past and future
Twitter is ephemeral. Tweets are short, throwaway observations, which capture the present moment, flow past quickly and are succeeded by more recent and relevant ones. We’ve looked at a way to favourite tweets, and to bookmark the URLs they may contain, but once you’ve done this, why would you want to keep a tweet? Why would you want to tweet in advance, rather than in the moment?
The Past
You can scroll through your last few thousand tweets or so (which might cover quite timespan, depending on how prolific you are) but searching and looking at hashtags won’t take you back very far, only a few days. And yet while finding past tweets might be difficult, they can come back to haunt you. If you want to find a tweet, it might be quite tricky, and yet if you want a tweet to disappear, someone may be able to dig it up!
Deleting Tweets
Let’s look first at deleting. You can delete one of your own tweets, by hovering over it and using the option that appears next to ‘reply’, ‘retweet’, etc. However, if you make a mistake in a tweet, it might be less confusing to send another tweet with a correction rather than delete one that people may already have seen. If you tweet something you shouldn’t… well, don’t!
You can’t delete someone else’s tweets, so if they’ve already retweeted you, taken a screenshot, or archived the tweet using some of the options below, it might be too late to stop your tweet being recirculated.
Saving Tweets
But what if you want to keep tweets, either your own or someone else’s? Why might you want to do this?
- Perhaps a discussion on Twitter helped you to think something through, and you want to keep the discussion so you can work it up into a blog post, or integrate it into a chapter or article later
- Maybe there was a good twitter ‘backchannel’ of livetweeting at a conference or other event, which you want to preserve either for yourself or others
- Perhaps you want to preserve a selection of good advice or observations on a topic, when you ‘crowdsourced’ – asked for suggestions on Twitter and got some great responses. You might want to keep and share them with others.
Tweet URLs
You can save a link to individual tweets. Each tweet has its own URL. To find this, you click on the time stamp which will take you to the URL of that individual tweet. You can then copy and paste it, save it or bookmark it. Under ‘more’ on the tweet you will find other options to share via email, embed etc. This form might not be the best or most convenient way to present tweets for others though.
Your Twitter Archive
If you want a copy of all your tweets, then Twitter can send you an archive of everything you’ve tweeted. Click on the gear icon, and select ‘Settings’. In your ‘Account’ page, scroll down to the bottom where you will see an option “Your Twitter archive: Request your archive”.
Storify
However, one of the nicest ways to keep tweets, especially for others, is a third party application called Storify. Storify is the tool which makes a narrative overview of tweets and other social media by linking to content on the web, including tweets, websites and blogs, Facebook posts, Youtube videos or photos on Flickr. You can search for content, drag and drop it into a linear narrative, add some comments to contextualise it, and publish it on the web or share the URL. You are linking to the original source, rather than taking the content, so it doesn’t breach copyright. It automatically notifies people whose content you have used in this way, so if they object to your use, you can edit out their material (all the material visible to Storify is publically visible anyway).
Storify is a really nice way to create and share a summary of tweets and other online material around an event or discussion, such as a conference, blog or livechat.
Extras: Other tools
There are other more advanced tools which you can use to archive tweets and present them in other visual formats, such as TAGSExplorer. These take a little more know-how to use, but might be things to explore as you get more confident with Twitter, and certainly give you an idea of what’s possible when analysing and visualising Twitter data. Here, as an example, is a visualisation of the tweets from the 2013 ALDinHE conference. This was created by Andy Mitchell. If you want to know more about how these visualisations were created, there are instructions online and further instructions on making a visualisation such as the ones linked to above.
If there have been any tweets over the course of the programme which you think will be useful to you, perhaps ones you favourited yesterday, or ones with further resources or advice on using Twitter, try archiving them in one of the ways shown above. If you are working towards the CamDot Soaring Badge you need to create and share a Twitter archive.
The Future
And what about future tweets?
You can schedule tweets to send themselves automatically at a future time. You can’t do this from Twitter itself, but will need to use one of the additional apps mentioned in Days Eight and Nine, so you may wish to leave this topic for later if you want to consolidate the basics first. Although Twitter is a medium which captures the moment, there are several reasons why you might want to schedule tweets for a later time.
- If your following contains people in a different timezone who are most likely to be online in the middle of the night, and you want to catch their attention
- If you want to tweet repeated information, updates or reminders, perhaps about an event you’re organising, a blog or article you’ve written or a deadline for a job or funding opportunity, without having to remember to do it (I’ve made use of this frequently throughout this programme!)
- If you’re away but want to keep some presence on Twitter
You can schedule tweets from both Tweetdeck and Hootsuite. To schedule a tweet in Hootsuite, write a tweet as normal, and then click on the calendar icon. This brings up a small calendar, where you can choose the time and date when you want your tweet to be sent.

If you don’t use Tweetdeck or Hootsuite, there are other apps which only schedule tweets. You might try, for example,Futuretweets or Twuffer or also Buffer (which works for other social media too). You can sign in with Twitter (or Facebook, or LinkedIn), and it will ask you for permission to access your Twitter feed. Once signed in, it will ask you what you want to share. Type in a tweet, and click ‘schedule’ or ‘buffer’. You will want to go to the ‘Schedule’ tab and set the timezone, and the day and time you want to tweet!
Well, that’s the last of our Ten Days of Twitter, but don’t worry if you’re still catching up – so are others. The conversation will be continuing on #CamDoT for a while and the team will be around on their various Twitter accounts. We hope you’ve found the programme useful, and thanks for joining in. Keep tweeting!
If you’ve experimented with Twitter and decided it’s not for you, then we hope we’ve helped you come to a well informed decision on whether to use it or not. If you now want to delete your account, it’s easy to do so. We encourage you to keep your digital footprint tidy.
10DOTTEL is adapted from Ten Days of Twitter for Learning Developers by Helen Webster which is licensed under aCreative Commons Attribution-NonCommercial-ShareAlike 3.0 Unported License.

This work is licensed under a Creative Commons Attribution-NonCommercial-ShareAlike 4.0 International License
Day nine: managing information
If you’re choosing who to follow effectively, then your Twitter feed should be full of interesting tweets and links to webpages etc which you might want to follow up on. It’s easy to lose track of it all, miss things and mislay things!
Twitter itself has a few features which can help you stay on top of all the information.
Favourites
If you see a tweet which interests you and which you’d like to come back to later, you can mark it as a ‘favourite’ and it will be stored for you to return to. To mark a tweet as a ‘favourite’, click the “favorite” icon:

When you want to look at your favourited tweets, you will see them marked in your Twitter stream, but it’s easier to see them all together. If you click on the ‘home’ button, and then click ‘Me’. As well as links to see the people you follow, and who follow you, there’s a link to all your Favorites.

When you favourite a tweet, the person who tweeted it is notified, which may help to gain you an extra follower, but it also gives them feedback on what others are finding useful.
If you set up a Tweetdeck account yesterday, you can also add a column for your ‘favourited’ tweets.
Search
You can also search for tweets, by username, hashtag or just by a keyword. The search box is at the top of the screen in the right hand corner. You can also organise the search results by top (most popular) topics, all results, or limit the results just to the people you follow.
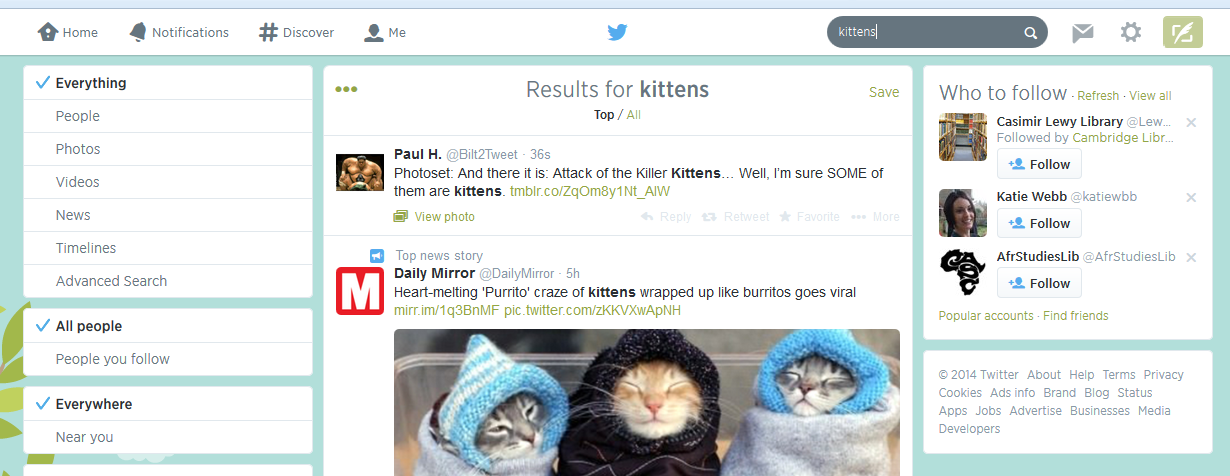
Once you have searched, a small ‘settings’ cog icon will appear next to the ‘search’ box (not the main cog icon at the top right of the screen!). If this is a search you might repeat regularly, click on this, and you can save the search so you don’t need to keep performing it – useful if you’re following a hastagged discussion.

You could also perform an advanced search using this icon- you can narrow down the tweets you’re looking for by word or by the person sending or receiving it, or by location.
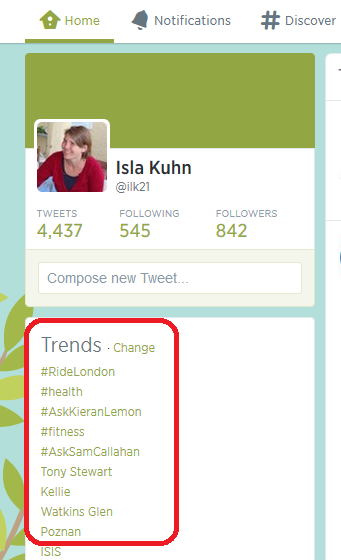
Trending
In the left hand column, Twitter will also show you what hashtags are popular at the moment. This may or may not be of much use to you! You can narrow the trends down by location, by clicking on ‘Change’ in this box, but if you are networking at a national or international level, this may not be very helpful.
Third party applications
If you’re feeling more adventurous again today, here are a few more third party apps which will help you curate all the links which people are tweeting about.
If you explored Tweetdeck yesterday, you may not have realised that not only can you add columns for lists of people, you can also add columns to follow hashtags. Click on ‘Add column’, and then choose ‘Search’. If you perform a search for a hashtag, you can add a new column to your Tweetdeck which will now display all the tweets using that hashtag, whether you follow the people using it or not. This might be useful if you are following a conference hashtag or chat such as #infolit but don’t want to follow all of the people tweeting with this hashtag.
Scoopit is a publishing platform (a bit like paper.li – see below) in that turns the posts, links, tweets etc that you want to gather together (and share?) into an easy to read, visually impressive magazine format. You can search for relevant content already on scoopit, catch any webpage, rescoop from other topics, or create your own scoop. (here’s an example of a scoopit page curated for Medical Librarians)
Scoopit can share this with others (and it will tweet automatically on your behalf, but it is not recommended that you ‘spam’ your followers in this way!) but you can just use it to pick up the links you might have missed on Twitter by adding Twitter as a source.
There’s lots of FAQs and easy step by step guide to getting started.
Pocket is an application which saves any webpage for you to look at in more detail later, when you have time. It is a bookmarking tool -if you find a webpage via a link in Twitter (or anywhere else), you can save it to Pocket, and then return to it and the other things you’ve saved later on. Pocket is a web browser based service, meaning you can access it from anywhere and any device or computer. To create an account, you’ll simply need an email address, username and password. On your desktop computer, you can download and install it into your browser, so you can simply hit a button in your toolbar to save a webpage (how to install it depends on which browser you prefer to use, but Pocket will take you through the steps – it’s easy!). When you use Twitter in a browser with Pocket installed (and also if you have installed the Pocket app on your smartphone or ipad), then a ‘Pocket’ option appears alongside the other options of ‘reply’, ‘retweet’, ‘favourite’ etc when you hover over a tweet containing a link, so you can save it right from the tweet instead of having to open the link and add it to Pocket from there. You can also access Pocket on the web, if you’re on a computer which isn’t yours, or where you can’t install it into the browser.
If you use a smartphone or tablet such as an iphone, ipad or Android device, you could download an app which curates content from your Twitter feed, such as Flipboard. Once you have downloaded the app, you can connect it with your Twitter account (or other social media) and it will draw in the links that people share with you and display them for you. To find out more about Flipboard, and how to set up an account, see instructions in its ‘support’ section. Alternatives to Flipboard are Zite and Pulse.
If you don’t have a tablet device, you can set up an account with news.me, which will deliver the main stories shared by the people you follow on Twitter in an email. To sign up, you’ll need to add your email address, and then connect it with your Twitter (or Facebook) account by clicking on the request to authorise this. That’s it!
li is an application which curates content from social media streams which you use(in this case, Twitter, but also Facebook, Google+ etc). It then presents the links it’s found in a easy to read magazine form. You can share this with others (and it will tweet automatically on your behalf, but it is not recommended that you ‘spam’ your followers in this way!) but you can just use it to pick up the links you might have missed on Twitter by adding Twitter as a source.
You can create an account and log in to Paper.li using either Twitter or Facebook. Use Twitter in this instance, of course! After that, follow the instructions given by Paper.li.
So there are a range of ways to stay on top of all the information that’s being shared with you by the people you follow. Choose one that looks useful to you, and experiment with it! Tweet to let us know your thoughts and findings!
Day eight: Managing People
Over the last 7 days, you may have found that as you continue to use Twitter, you come across more and more interesting people to follow and your following grows exponentially. Keeping track of them all can be a challenge, and sometimes you will want to focus on certain groups of them over others, or check in on some people only sporadically. This is hard to do in the undifferentiated stream of tweets on your Twitter feed, where they are all mixed in together. Fortunately, there are ways to split up your Twitter stream and group the people you follow into separate streams, so you can keep an eye on their tweets as it suits you.
You might want to group the people you follow into any of the types that we looked at in Day Three. Some examples might be
- Colleagues or services at your institution
- Colleagues and peers across the country/world in a particular field
- Professional or funding bodies
- News accounts
- Social, personal or fun accounts
Twitter lists
Twitter has a feature which allows you to make lists of people – and you need not follow all of them to add them to a list. These lists can be private, so only you can see them, or they might be public so you can share them with others. I created such a list for the participants of this course on Day Two, so you could find each other on Day Three. You might create such a list for the benefit of others, for example, to bring together the attendees at a workshop or conference, or the top accounts on a particular topic which you recommend other people should follow. You can share a list by giving people the URL of the list page, or let them view the lists you’ve created on your profile, where they can subscribe to your lists too.
To create a list on Twitter (PDF guide in case the screenshots aren’t clear enough)
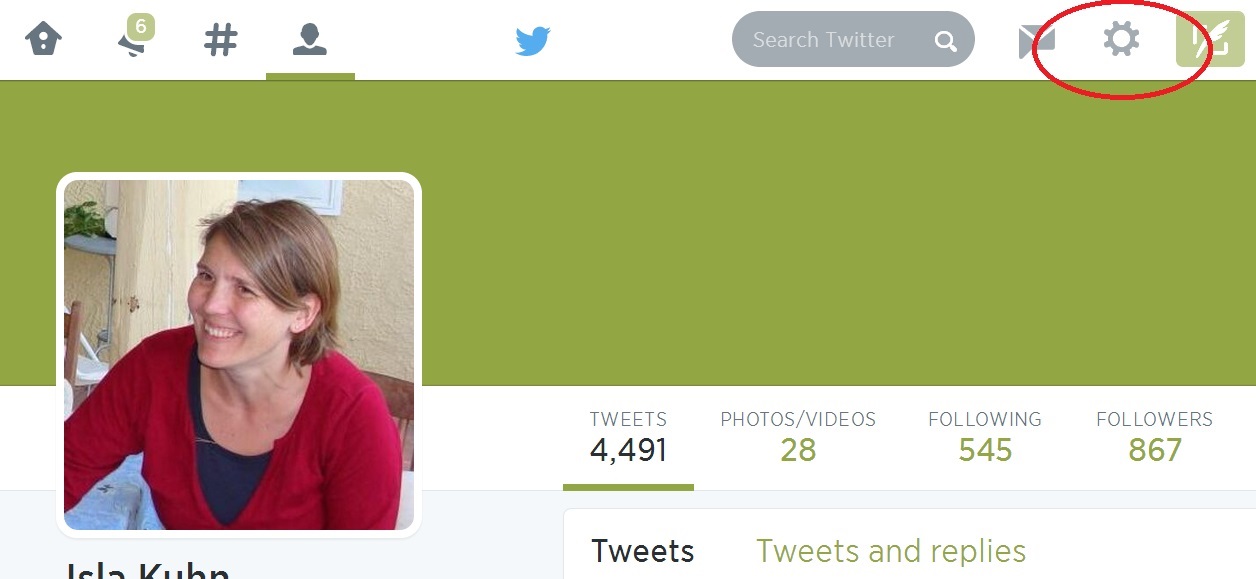
To create a list on Twitter, go to the gear icon at the top right of the page. Select ‘Lists’, and you will see a page which will contain any lists you will make.
You can see any existing lists, and you have the opportunity to create a new one. Click on ‘Create list’,
and you will be asked to name your new list and add a brief description. This description will be very helpful if you now choose to make the list public, so others can find and subscribe to it.

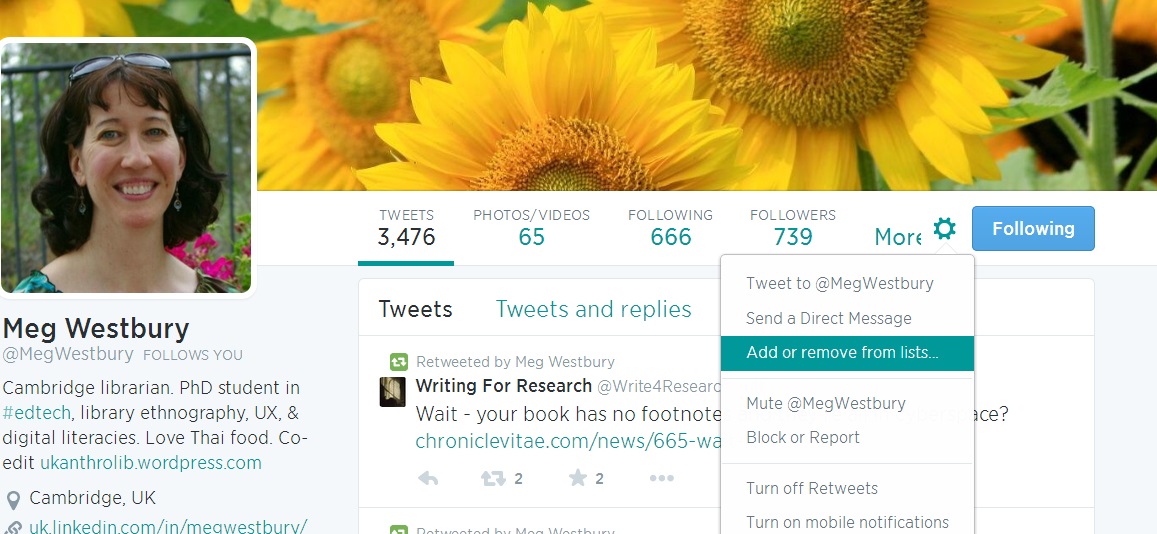
You will now be invited to search for people to add to your list. You can also add them later, by clicking on their @handle and going to their profile. Next to the ‘Follow(ing)’ button, you will see cog icon. If you click on this, you will see a menu containing the option ‘add or remove from lists’ (this is also where you can send them private Direct Messages, as in Day 4).
While we’re on the topic of managing people, you can also block or report people using this menu, for example, if you are followed by a spam account or someone you don’t want following you.
To add any person to your list, simply tick the box:
To view your lists, you can simply click on the cog icon, and click ‘lists’, pick the list you want to view, and you’ll see only the tweets from the people in that list.
Third Party Apps
The beauty of Twitter is in its simplicity as a platform. However, sometimes you need a bit more functionality. There are some third party applications created by other companies as add-ons to Twitter, to help you out with some of the things about Twitter which you may find a bit overwhelming. Some of them will need to be integrated with your Twitter account to drawn information from them, and to do this, you will need to grant them access to your account (you can revoke this again from your Twitter account settings).
You might want a more convenient way to view different aspects of your Twitter stream, or even add in updates from other platforms such as Facebook or LinkedIn together with Twitter, so your whole social media stream is visible in one place. To do this, you can use one of the third party applications that were developed to make Twitter easier to use.
Tweetdeck is owned by Twitter, and is a good way to manage more than one account, if you have more than one (for personal and professional use, or perhaps an individual one and an official one on behalf of an institution). However it’s easy to get confused and tweet from the wrong one! However, you can also use Tweetdeck to split your Twitter stream into columns divided by people. It will import any lists you have made on Twitter too.
here’s a picture of my Tweetdeck:

You will need to create an account, but you can use your existing Twitter details. Once you have set up an account, you can connect your Twitter account(s). You can use it as a web-based application to access from anywhere, or you can download the Tweetdeck app to your computer (there is no app for smartphones or tablets). Tweetdeck is organised into a number of columns, and gives you a number of columns automatically, such as your timeline, your own tweets or your @mentions (tweets that mention you), and you can add new columns for the lists you create. You can also create new lists in Tweetdeck. Click on ‘add column’, and choose ‘lists’ (or any other column you want to add!).
You can do everything we’ve covered in Twitter on Tweetdeck too, including shortening URLs. Tweetdeck also makes some other things in Twitter a little bit easier. For example, when you retweet, it will ask you if you simply want to retweet or if you want to edit the tweet, as we discussed in Day 6. On Twitter, you need to copy and paste the tweet if you want to edit it, which can be fiddly; this does it automatically.
Hootsuite is similar application to Tweetdeck, but it allows you also to import other social media accounts such as Facebook and LinkedIn, and it is also available as an app for mobile devices. You can sign up using Facebook, Google or you Twitter details, or if you prefer to keep Facebook separate from your professional social media use, you can sign up with an email address, name and password. It will then ask you to add your chosen social network accounts. You can then add streams of content similarly as in Tweetdeck, and tabs for the different social networks. Hootsuite has a quick start guide to help you set up your account.
Here’s a picture of my Hootsuite:

The other bonus of tools like Tweetdeck and Hootsuite is that you don’t see the advertising ‘promoted tweets’ from companies you don’t follow!
Think about the kinds of update you’ve seen on Twitter so far from the people you follow. Who do you most want to see tweets from? You might want to try making a list of your colleagues on Twitter, or perhaps one for the professional and funding bodies you follow.
Day seven: Hashtags
 Hashtag was the American Dialect Society word of the year in 2012 (beating Gangnam Style to the title!). It’s a word used both on and offline and you will have seen it mentioned during this course. So what exactly is a hashtag?
Hashtags are keywords in a tweet which can be used to group messages on the same subject together. Always preceded by the # symbol, these keywords can be clicked on or searched for to bring up every instance where they have been used even if you don’t follow the person who posted the message. The hashtag for this course is #camDOT which is a shortened version of Cambridge Ten Days of Twitter.
Anyone can create a hashtag but there are some basic rules that you should follow:
- hashtags need to be written as one word. You can combine more than one word but remember not to leave spaces in between e.g.#saturdaylibrarian not #saturday librarian
- try not to make your hashtag too long. Remember that you only have 140 characters to play with in a tweet and hashtags count as characters
- make sure that the hashtag you want to use is not already in use for something else or you might find yourself in the middle of someone else’s conversation! You can check this by searching for the hashtag in the search box
- capitalisation is not important. As long as the hashtag is spelt the same then Twitter will find it e.g. #camDOT and #camdot will bring up the same list of tweets
- much like tagging in a library catalogue, hashtags don’t have to make sense to everyone as long as they make sense to those that use them. For example hashtags for conferences are often shortened versions of the conference name which probably wouldn’t make much sense to those not in the know. Organisers will make participants aware of the hashtag so they know what to use/follow. Be aware that if you want people outside of the core group to understand the hashtag you will need to make it self explanatory
- Mac users will need to press the alt key and the 3 key together to make the # symbol
A small word of caution about creating hastags – always read them through to make sure that it doesn’t accidently spell out something offensive. This has happened to people in the past so it’s good practice to double check and avoid any potential embarrassments!
Hashtags are something which Twitter users developed on their own. Once people became aware of their potential they were widely adopted and today they are even used on rival social networks such as Facebook.
Now that you know what a hashtag is and how to create one it’s time to discuss what they can be used for:
- discussions: as we have already talked about, the main purpose of hashtags is to keep tweets on the same subject together. This is useful when having a conversation on Twitter as it allows people in different countries and time zones to participate. Conversations can go on for a defined period of time or be open-ended but they are always discoverable by searching for the hashtag
- live-chats: as the name suggests these are Twitter chats which take place live at a designated time which has been announced in advance. There are chats on a range of topics which anyone is free to join in. These include library focused chats such as #uklibchat and those which look at related areas such as #HElivechat. Even if you can’t join in live with a chat you can always catch up later by following the hashtag
- conferences and events: this is probably the most common use for hashtags in the library community. People use event hashtags to learn more about an event, even when they can’t attend in person. They can also be used to network with other attendees before the event, something especially useful if you’re a bit unsure about networking. Many events will have a designated hashtag (e.g. #lac14 will bring up tweets from the 2014 Libraries@Cambridge conference). These hashtags can then be used before and after the event to follow up on ideas discussed. It can also be used to live-tweet the conference/event as it happens. Not all conferences welcome their presentations being tweeted (indeed this has caused controversy). If this is the case there will usually be some type of announcement but it’s good practice to check if in doubt
- live-tweeting: as above, live-tweeting is tweeting about an event as it happens. Sometimes events will schedule people to do this officially but it’s usually participants themselves who live-tweet. A word of caution about live-tweeting. It can be difficult to get across an idea in 140 characters, especially when you are trying to listen for the next soundbite. Make sure that your tweet cannot be interpreted in the wrong way and if in doubt then don’t post it. You can always follow up and tweet later after you have clarification. It’s also important to give proper credit for the content of your tweet. One way to do this is by tweeting the full name of the presenter and what they are talking about and then using their initials in subsequent tweets e.g. tweet one: Claire Sewell from Cambridge talks about RDA #hashtag. tweet two: CS: RDA has had a huge impact at Cambridge #hashtag. Live-tweeting doesn’t always have to be serious. Why not check out Librarians Live-Tweeting a Movie to get some practice?
- bringing people together: hashtags can help to bring together like-minded people or groups. Once you have found a hashtag which is useful it’s worth keeping an eye on it to follow the latest developments. A Cambridge example is the #camlibs hashtag which is used by Cambridge librarians to chat, ask for help or share news and resources. It’s my recommendation for the hashtag to follow

Below is a list of some popular hashtags for librarians to follow:
- live-chats: #SLATalk is a regular Twitter chat based in the USA which looks at various topics in librarianship. #ulkibchat is another regular chat (further information can be found here)
- library qualifications: #libraryschool is a good general hashtag to follow but individual school often have their own such as #aberils for Aberystwyth students. The #Chartership tag can be used by anyone working towards CILIP qualifications
- special branches/topics: just as there are many different types of librarianship there are many different hashtags related to them. #speccolls focuses on special collections librarianship whilst #cataloguing focuses on (unsurprisingly) cataloguing. There are also hashtags for information topics such as #infolit for information literacy related tweets
- online reading groups: #llrg is the hashtag for the Library Leadership Reading Group which meets online to discuss a designated article or book. Think book club that you can attend in your pyjamas!
Now that you know all about hashtags it’s time to start using them. Try tweeting out a message with the #camDOT tag to interact with other course participants. If you have any other hashtags which you find useful then feel free to share them with your fellow camdotters. As long as you include the #camDOT hashtag in your tweet they will be able to see it.
Good luck and happy tagging!
Photo credits: [1] oggin via Photopin cc [2] mikecogh via Photopin cc
Day six: Retweeting
You’ve sent a few tweets over the last five days – hopefully you’ve found plenty in the world of libraries which would be of interest to others, whether they are your Cambridge colleagues, peers in your field, other professions within or beyond Higher Education, or to the general public.
But it really would be hard work to generate all the material yourself to feed your followers with regular, interesting tweets! Fortunately, you don’t have to – you can retweet the tweets of others. It’s sort of like forwarding an email, but to everyone who’s following you. They see the content of the original tweet, who it came from originally, and perhaps also a contextualising comment from you. By doing this, you’re performing a valuable service:
- to your followers, by sifting the stream of information available to them, filtering out what’s potentially interesting to them, and also by making them aware of potential new contacts they can add to their network. They may already follow the person you’ve retweeted, in which case you’re bringing their attention to something they may have missed the first time. They may not yet follow the original tweeter, in which case, you’ve made available to them information they may not have had access to, and given them a new contact to follow.
- to the people you follow, by amplifying their message and spreading it outside their network (and also possibly putting them in touch with new contacts).
- and of course, you’re displaying to others that you’re well connected to interesting and important people, and that you are a discerning judge of what information is interesting and significant!
We’ve been retweeting items I hoped might be of interest to you and my other followers on our own accounts over the last week. To retweet a message, you simply click on the ‘retweet’ button which appears in the middle right below each tweet when you hover over it. The retweet button looks like this:
 You can see it in action in the tweet embedded below. Click on it, and you can retweet it:
The message will then appear in your followers’ twitter streams as if it appeared from the original sender, even though they may not follow them. The tweet that they see will be marked with ‘retweeted by @yourname’ in small lettering, so if they look, they can tell that it was you who retweeted it. The original tweet will show how many times it has been retweeted as well. In the example above, you can see ‘2 retweets’ at the bottom. If you click on that, you can see who has retweeted it.
However, as with sending @messages using ‘reply’, if you simply use Twitter’s ‘retweet’ button, you’re missing out on retweeting in the most effective way. The etiquette around retweeting is very much in sympathy with academic conventions of acknowledgement. You can quote the tweet – you can either copy and paste the text into your own tweet, or if you are using an app like Hootsuite or Tweetdeck (we’ll look at these later on!), they give you the option to quote and edit, or just retweet. This makes the tweet come from your account, rather than the original sender, making it clear that it’s you who has chosen to pass this information on.
However, that would make it look as if you’re claiming that it’s your tweet. To clarify that you’re retweeting, the convention is to:
- Start the tweet by adding a comment of your own, if you wish and if there is room! If you don’t add any comment, then your retweet may be ambiguous – are you endorsing the original tweet? Plus, it may add context, value and character for your followers if you add something of your own.
- Write RT (which stands for retweet) and then the original tweeter’s @name
- Copy and paste their original tweet.
the result will look something like this:
So, to the original tweet, you’ll need to add RT and the original tweeter’s @name, and possibly quotation marks if you feel you need to clarify any further. Of course, as you only have 140 characters, adding these will eat into the original message!
You can, of course, cut out any part of the original tweet you feel is unnecessary, or to make space for your own comment, but to signal that you’ve done so, it’s polite to write MT (modified tweet) instead of RT. This is all a good reason to keep your own tweets as short as possible and not use up all 140 characters, so your own tweets can be easily retweeted!
If you want to retweet just a URL link that someone has passed on rather than their comment, you can add ‘via @name’ or HT @name (HT stands for Hat Tip) to clarify that you found the source through them.
Remember that to use Twitter effectively to promote your own work, you need to update frequently with interesting content to gain a following, and you also need to reciprocate and promote the work of others. No one wants to read or retweet a Twitter feed which is just broadcasting announcements about itself!
So have a look at your twitter stream and see if you can find tweets you think your followers might be interested in – funding opportunities, calls for papers, an item of news, a new blog post or publication someone’s tweeted about, a comment you agree with…and start retweeting!
If you’re working towards your CamDOT Flying Badge, you will need to send at least 3 retweets over the next few days.
CamDoT is adapted from Ten Days of Twitter for Learning Developers by Helen Webster which is licensed under aCreative Commons Attribution-NonCommercial-ShareAlike 3.0 Unported License.

This work is licensed under a Creative Commons Attribution-NonCommercial-ShareAlike 4.0 International License.
Day five: tweeting URLs and links
You can’t say a lot in 140 characters – but you can link to other places on the web where a topic can be discussed at greater length, perhaps in an article or blog post. Maybe you’ve seen a new publication, item of news or a webpage you want to comment on or pass on to your followers. Perhaps you’ve just posted something on a blog or website, uploaded a resource or published an article and you want to encourage people to have a look. Twitter works really well as a way to bring people’s attention to other, longer things online.
You can simply copy and paste a website’s URL into a tweet. However, many URLs are pretty long, and even if they fit into 140 characters, it leaves less space for you to add a contextualising explanation or comment which will encourage people to click on the link. Fortunately, Twitter has an inbuilt URL shortener, which will cut the link down to 20 characters.
You can also use other URL-shortening sites, which will cut the link down to even less. Try these ones:
- Tinyurl.com
- Goo.gl (owned by Google, obviously! If you have a Google+ account, you can track statistics on click-through, useful if you’re evaluating publicity strategies for a new web resource or event)
- Ow.ly (you can also add links to photos, files and videos with this site, useful for spicing up livetweets from conferences or events)
- Bit.ly (you can also track click-throughs with this site)
When tweeting a link, it’s good practice to begin your tweet with a brief comment explaining what it is and why you’re tweeting it. A URL by itself doesn’t necessarily say much about content or provenance, and a shortened URL using one of the above services gives nothing away at all about what it is. Your followers will likely ignore your tweet and the link if they can’t immediately see what it’s about, where it’s from and why they should be interested.
A tweet with only a shortened link in it is very likely to be spam and senders of such tweets are likely to be blocked (here’s how to block users if you get such spam tweets). Moreover, it might be assumed that by sharing a link, you are endorsing the content, so if not, it would be as well to add a comment stating your stance on it – do you agree, or disagree? Or is it simply that you found it useful and think your followers might too? Another reason to keep the URL as it is rather than use a URL shortener is longevity – if that URL shortening service is withdrawn, the link will no longer work. It’s a trade-off between keeping it short, having some comment and analytics, and longevity and a bit more context in the URL.
So what might you link to?
- a news story about Higher Education with a comment on how it’s reported
- a conference or funding call that’s been announced
- a book or article you recommend (or don’t recommend…)
- a blog post you found interesting (and whether you agree or not)
- slides or other material from a presentation you attended (or gave!)
- a video on youtube or vimeo, perhaps of a presentation or talk, or public engagement
- something you’ve uploaded yourself. This blog is set to update automatically on Twitter whenever I post something new (which is why there is a hashtag in the blog post title! It will also become a tweet). Try and personalise the automatic update message yourself if you can.
- your publications. There’s evidence that tweeting about your research output really helps to increase views, and therefore possibly citations, especially if you follow strategies such as those suggested here.
You’re not expected to spend time deliberately looking for links to tweet to your followers; this is more a byproduct from anything you happen to be doing online anyway. And with more and more sites including a ‘Share This’ button or buttons for the various social media platforms, it’s very easy and quick to do. This is part of what we mean by being an ‘Open Scholar’ in the digital age – it costs you very little to share your useful daily digital finds with others, so why not?
See what you come across today online, and remember to tweet it to your followers!
Day four : Sending @messages to people
You’ve sent some tweets, followed people and hopefully gained some followers of your own. Some people prefer to listen more than they tweet, which is fine – the only thing to consider is, the more you say about your interests, the more people will know what kind of information might be useful to you, and direct relevant things your way. It’s a way of fine-tuning your twitter feed as well as providing useful information to others.
Sometimes you might want to address a tweet to someone – it will be visible to other followers, but you want to catch a particular person’s attention with it. This might be because you are replying to or responding to one of their tweets, asking them a question, because you think they might be particularly interested in the information passed on in your tweet and want to make sure it catches their eye, or because you mention them in the tweet and want them to know, for example, if you retweet one of their tweets or are talking about their work. It may also be that you don’t follow that person, or they don’t follow you, but you still want to catch their attention with one particular tweet: they will still see it if you include their @username.
For example:
- hey, @EmmaEtteridge, enjoyed your presentation!
- Giving a workshop at your department, @EmmaEtteridge – are you around for coffee? would be great to meet up!
- Great information on RDM – of interest, @EmmaEtteridge http://www.jisc.ac.uk/guides/research-data-management
- I recommend this too! RT @EmmaEtteridge “a good read on digital scholarship! http://www.bloomsburyacademic.com/view/DigitalScholar_9781849666275/book-ba-9781849666275.xml “
To call someone’s attention to a tweet with an @mention, you use their username or ‘handle’ preceded by a @ sign. For example, to let me know you’ve mentioned me, you would include ‘@EmmaEtteridge’ in the tweet (this is another reason to keep your Twitter handle as short as you can – it uses up some of the 140 characters!) This is a feature that originated with the users of Twitter, which was then designed into the platform. It’s what has turned Twitter from a broadcast medium of updates into a conversation, and that’s Twitter’s real strength. The most relevant example of this is Cambridge 10 Days of Twitter. Meg sent out this tweet:
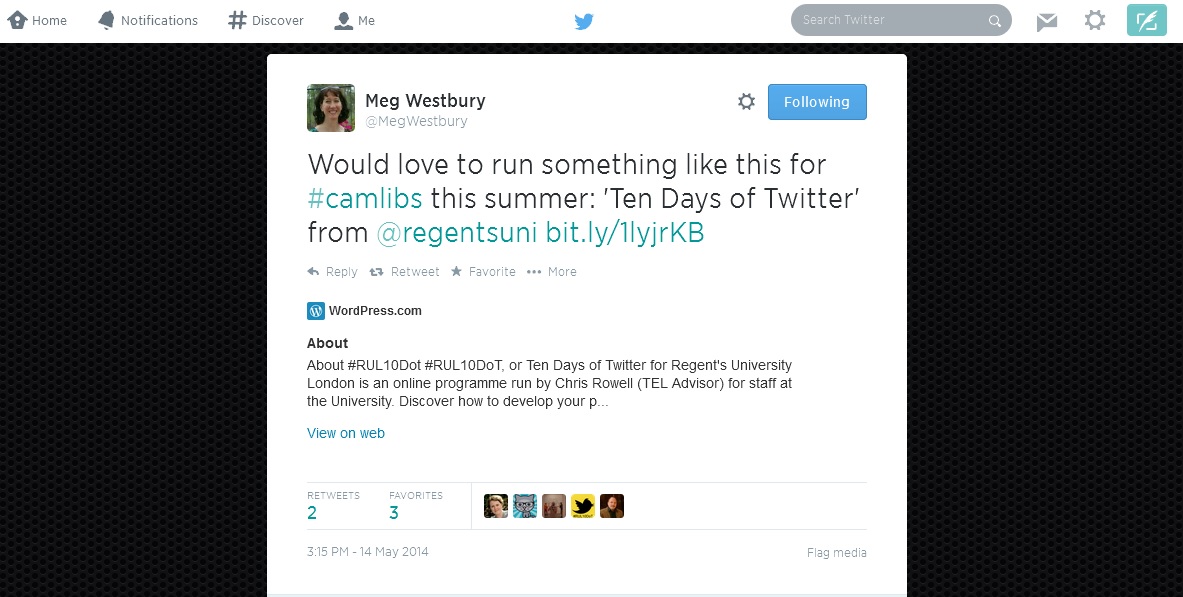
and Meg’s followers and others started talking, about who wanted to be involved, when we should run it and who’d like to do what when, and now you are reading my Day Four post!
Note – as the @ sign is reserved for marking people’s handles, you can’t use it as an abbreviation for ‘at’, for example, ‘let’s meet @6pm @cafe’ – it will treat these as an @message, and it’s likely that someone, somewhere, will have chosen @6pm or @cafe as a handle!
A small but important point is where you place the @username. If you are responding to a tweet, using the ‘reply’ button, then Twitter will automatically begin your tweet response with the @username, and you can then type the rest of your message. However, if the very first thing in the tweet is someone’s @username, then only that person and those who follow both of you will be able to see it. If you want the tweet to have a wider audience, then you either need to put a full stop in front of the @ sign like this: .@EmmaEtteridge OR you could include the @username later on in your tweet as part of the sentence, for example: ‘reading @EmmaEtteridge’s blog post about Twitter – some useful tips!’
Why might you want a wider audience to see conversations between you and another user?
What’s in it for them:
- It’s polite to acknowledge them if you’re retweeting something they’ve said, or to let them know if you’re commenting on their work
- You are drawing attention to them and their work to people who don’t already follow them – they get publicity and new followers
What’s in it for you:
- You gain a reputation as a polite, helpful, knowledgeable and well-connected professional
- You may also gain new followers or make new connections
What’s in it for followers:
- They get to know about someone’s work which they may have been unaware of, and a new person to follow
- They are offered a chance to contribute to the discussion too, and thereby gain new contacts and audiences
- If replying to someone who’s passed on useful information to you specifically, it’s helpful to copy in their reply to your tweet response, in case your followers are also interested in the information.
Of course, there may be times when you don’t want a wide audience to see the interaction, if it’s not going to be understandable out of context, or of interest to them but just cluttering up their feed, and in these cases, you can just start the message with ‘@’. Remember that Twitter is a very public medium, and whether you @message someone or not, your tweets will be visible to anyone who views your profile. If you really want to send a message to just one person, but don’t want it publicly visible, Twitter allows you to send them a DM or Direct Message. (if you want to practice sending a Direct Message, feel free to contact me!)
To see @messages directed at you, click on this icon  at the top of any of your Twitter pages. They will also appear in your Twitter stream, but you may miss them there! Depending on your settings, you can also receive an email when someone @messages you. To set your account to email you when someone mentions you, click on Settings (the little cog icon at the top) and then ‘Email Notifications’ in the left hand menu.
So- send some @messages to people you follow- ask them a question, draw their attention to something, comment on something they’ve tweeted! Reply to anyone who messages you, to be polite. And remember to send me (@EmmaEtteridge) an @message to tell me how it is going!
CamDoT is adapted from Ten Days of Twitter for Learning Developers by Helen Webster which is licensed under a Creative Commons Attribution-NonCommercial-ShareAlike 3.0 Unported License.
Day three: Following people
 Now that you’re up and running on Twitter it’s time to grow your network. There’s no magic number of people you need to follow and it depends a lot on what you want to get out of Twitter. You need to have enough people in your network that you receive a decent stream of information but you may find following too many people at first overwhelming, especially if they are very enthusiastic tweeters. Of course you will end up following more people the longer you are on Twitter but don’t worry, there are tools to help you manage your network which we will discuss later in the course.
The easiest way for participants in this course to follow people is to begin by following each other. This link contains a list of those who tweeted yesterday as part of CamDOT. To follow someone just click on their name to bring up their profile and then click the follow button. Please note that if there is a little padlock next to the name this means the person has a protected account and you will need their approval to become a follower.
With Twitter, the best way to develop your network is to let it grow organically:
- Suggestions: Twitter will suggest accounts for you to follow in a box on the right hand side of your screen. When you first register Twitter will start by suggesting some popular accounts so you will see some celebrities or famous figures. As your network grows and Twitter learns what you like these suggestions will become more intelligent so it’s worth keeping an eye on them (although it will probably still encourage you to follow Katy Perry once in a while!)
- Followers: Twitter will send you a notification when someone follows you. It’s worth checking out their profiles to see if you would be interested in following them back. You could also explore their follower list for interesting accounts to follow
- Retweets: If someone retweets your message (shares it with their followers) then this means they have found what you said interesting. Chances are that you have some interests in common so it might be worth following them. We will look at retweets in more depth another day
- Hashtags: These are tags at the end of the tweet preceded by the # symbol. They are used to group tweets on the same topic together and can show that someone has the same interests as you. Again, we will cover these later in the course
- #FF or #FollowFriday: Every Friday people on Twitter tweet the names of people they think are worth following. Watch out for these or ask your followers who else you should be following
Below are some suggestions of people/groups to follow to get you started:
- ‘Celebrity accounts’ and media dons: Following well-known people in academia, especially those in Education, will give you some ideas of Twitter best practice as well as keeping you up to date with developments in the field. You could follow educational researchers such as Tara Brabazon or academics such as Mary Beard
- Professional bodies: These accounts often tweet about events, news, policy or funding opportunitites. You could try CILIP, CILIP East, SLA Europe, the Higher Education Academy or SCONUL
- Funding bodies: For calls for funding and other news, follow bodies such as the Research Councils UK (@research_uk), or JISC
- Academic and professional press: Education press such as @TimesHigherEd, @InsideHigherEd or @gdnHigherEd will give you access to news stories which may interest you or your followers. Following their journalists too might be a way to hear about interesting stories or even raise your own profile in the press. Many journals also have their own Twitter accounts which are useful for updates on calls for contributions or new contents
- Outreach: Following your institution’s account/s can be a great way to keep up to date and get involved. Follow Cambridge University, Cambrige University Library or why not look for other libraries in Cambridge?
- Other librarians: Cambridge librarians are a very active bunch and lots of them already have well-used Twitter accounts. Check out this list for some of the most prolific Cambridge tweeters
- Professional networks: These are useful for finding out about events aimed specifically at the information sector. One of the most popular is the LIS New Professionals Network which has details of many opportunities
It’s worth remembering that you don’t need to restrict your network to those in the same sector as you. The beauty of Twitter is that it can open up conversations with people you might not otherwise get a chance to interact with. Making connections is a valuable way of exploring beyond the library sector so why not consider following people from the wider educational world or people who write on technology?
Once you have an established network it’s important to maintain it and this may mean unfollowing people. Interests change over time, both yours and those of people you follow, so you may find unfollowing people is the best thing to do. To unfollow someone you simply click the unfollow button on their profile. It can feel strange the first time that you do this but it is the nature of Twitter. Remember that Twitter is not like sites such as Facebook where following is reciprocal – you can create your own unique network.
So, the only thing left to do now is go forth and follow! Follow the above suggestions, keep an open mind and you will soon find that your network starts to grow. Then you will be able to start putting the information you get from Twitter to use!
Speech bubble photo credit: olalindberg via Photopin cc
Day two: sending tweets
Twitter only allows you to send 140 characters, which doesn’t seem much. In academia, we almost always write at length about complex ideas, so it’s difficult to say something meaningful in such a short amount of text. But that doesn’t mean that Twitter is superficial or only used to tweet about frivolous things. Many people, especially in an HE context, who are new to Twitter aren’t sure what to say, or why updates about whatever they’re doing would be interesting to others. But there are actually many aspects of your day-to-day work that would be of very practical use to others. Have a look at some Twitter feeds from academic tweeters and see what kinds of information they share, to get an idea of how you really can say something useful and engaging in 140 characters.
The appropriate tone for a professional twitter account needn’t be overly formal – you can be chatty and conversational, and allow your personality to come through. In fact, you’ll have to be a bit informal if you want to fit everything in, using abbreviations and even textspeak! Even if tweeting on behalf of a department or group, you need to be engaging rather than formal. Do remember though, if you’re tweeting in any professional capacity, that Twitter is a very public medium, and that your tweets can be kept by others, even if you delete them (more on this on Day 10). Don’t say anything you wouldn’t normally say openly in a work context.
Some examples of what you might tweet about:
- an article you’re reading that’s interesting or a book you recommend
- an online resource you’ve stumbled across
- a workshop, webinar, seminar or conference you’re going to – others may not have known about it, may want to meet you if they’re also going to be there, or may want to ask you about it if they can’t make it
- a new person you met today who might be a good contact for you or others in future
- some insight on academic work from an incident that happened today
- advice, tips or insights into how you teach or research for students or other colleagues
- a question asked by a student or colleague that made you think
- slides from a talk or lecture which you’ve just uploaded online
- your thoughts on an education or other news story relevant to your work
- a funding, project or job opportunity you’ve just seen
- a digital tool or software you’re using or problem you’ve solved with it
- a typical day – an insight into an academic’s life or moral support
- your new publication or report which has just come out (there are ways of mentioning this gracefully!)
Sending a tweet is really easy – when you’re logged into Twitter, you’ll see a box on the left hand side, which says ‘Compose a tweet’. If you click in the box, you’ll be able to write your tweet and then click the ‘Tweet’ button. You can also use the feather quill pen icon in the top right of the screen to compose.

Remember – you’re only able to write 140 characters including spaces, and there’s a small counter below this box which tells you how many characters you have left. It will stop you once you go over and highlight how many characters you need to delete. You’ll soon develop a suitably concise style, and learn the tricks to abbreviate your writing, such as using ‘&’ instead of ‘and’. This all adds to the informal tone.
This bit is important – For this second Day of Twitter, as your first message, please send the following tweet- we’ll explain why later!
Joining in #CamDoT to learn more about Twitter!
Over the next week, we’ll be sending the following ten types of tweets. For today, though, just send a few of the first type of tweet over the course of the day, using the examples above. You could include the hashtag #CamDoT in your tweets – again, we’ll explain why later!
- A simple message – what are you up to? What kind of event or activity might your intended following find interesting, personable or quirky? You could let them know about an upcoming event they were unaware of or might also be present at, a thought about your research or work that’s just occurred to you, or just show that you’re approachable and share common experiences. Don’t agonise over it though – Twitter is ephemeral in many ways!
- (no’s 2-10 are examples of what we’ll be moving on to over the rest of the week) An @ message directed to someone. Ask someone a question, comment or reply to one of their tweets, thank them for a RT or welcome a new follower. NB – don’t start your tweet with the @ sign, as then only the people that follow both of you will see it! either include their @name later in the message or add a full stop .@ before the @ if it’s at the start.
- Send a direct message (DM) to someone. What kind of message would need to be private in this way?
- A link to something interesting and relevant you’ve read online, or link to a journal or book. Shorten it using Twitter’s automatic tool or a separate one such as tinyURL, bitly or Ow.ly Add a bit of context or comment on it!
- Ask a question of your followers – crowdsource their views, ask for tips or advice or recommendations on a topic of mutual interest! Perhaps ask them to retweet (pls RT)
- Tweet a link to something you’ve shared online recently- a profile update, slides from a conference presentation, handouts from a workshop. Many platforms can be set up to do this automatically when you update, such as a blog, Slideshare, Storify, LinkedIn, etc. Add an engaging and contextualising comment!
- A retweeted, quoted tweet from someone else. Don’t just use Twitter’s retweet button – start with your own comment, then add RT and the @name of the originator or retweeter.
- A tweet incorporating a hashtag which links to a wider discussion. Search for your chosen hashtag first, to get a sense of what others use it for and what the discussion has been, and what you can add. Look at tweets from followers for hashtag discussions to join, make one up and see if it’s been used, or try adding something to an existing hashtag such as #studychat or #infolit
- Livetweet an event of some kind, even if only for 10 minutes. You might try a research seminar, conference presentation or lecture. It’s polite to ask permission from the speaker. See if there is a hashtag for the event and if so, use it. Practice summarising the event and distinguishing your comments from the speaker’s.
- Take part in a livechat on twitter. #UKedchat, #ECRchat and #PhDchat are popular ones.
We’ll look at nos 2-10 over the next few days. If you can think of any more professional uses for Twitter, then do add them in the comments, or tweet about it!
If you’re thinking of tweeting in an official capacity for your research group or department, then think about the balance of your own announcements to other information (Twitter is still a conversation, not an announcement service, and too much one-way, impersonal promotion will turn off your following!). This presentation from Library Marketing Toolkit has some good tips.
Day one: setting up your Twitter profile
Welcome to 10 Days of Twitter! Let’s get started…
To start off with, you’ll need to sign up to Twitter. You can see people’s tweets without an account, by viewing their profile or by searching for a keyword, as it’s a very public social media channel. Without an account, though, you won’t be able to join in the conversation, and that’s the first and main thing to learn about Twitter:
Twitter is a conversation.
Setting up an account on Twitter is easy – but before you do that there are a few things to think about in terms of creating an engaging and effective profile:
- your @name (called your handle), which people will use to identify and direct messages to you;
- your avatar or profile picture, which is how people will pick your tweets out of their Twitter feed;
- your identifying information, such as your location and personal website or webpage;
- your ‘bio’ or strapline, which will describe who you are and why people might want to follow you;
- and the overall look of your Twitter profile, which makes it distinct and memorable when people view it.
- If you already have a Twitter account, then you might want to take some time to refine your profile taking into account your overall aims and audience, including thinking about whether you feel you need separate accounts for personal and teaching and/or research purposes.
Setting up your Account
If you don’t yet use Twitter, visit the site to set up an account (https://twitter.com/). We’ll also mention using Twitter to represent a group such as your course or library, but in the first instance, it might be best to explore Twitter in a personal capacity.

-
You’ll first need to enter a real name, email address and password to sign up.
-
At the second stage, you need to think of a username, which will be your @name. This might be some version of your real name or, if your name is common and most variations of it have already been taken, you might think of a professional and memorable pseudonym. Don’t worry – you can change this later, and you can also add your real name to your profile so that it’s identifiably you. This is useful at conferences. If you want to set up an account for a course or library, then something which will be memorable and match other materials will be important.
-
The next steps of signing up on Twitter take you through finding people to follow, but we recommend you skip this step for now. We will come back to finding people to follow on Day Three, but Twitter will ask you to follow at least six people before you can move on to filling out your profile, so we suggest you follow these accounts as a good start:
Individual members of the CamDoT team:
- Georgina Cronin (@senorcthulhu)
- Ryan Cronin (@wrycrow)
- Emma Etteridge (@EmmaEtteridge)
- Isla Kuhn (@ilk21)
- Yvonne Nobis (@yvonnenobis)
- Claire Sewell (@ces43)
- Meg Westbury (@MegWestbury)
There is also a list of Cambridge library tweeters which you can check out now if you’d like (we’ll mention it again later in the course as well).
The next thing you should do is start to fill out your profile, so that when people look at it, they will feel encouraged to follow you.
-
Upload a profile picture. When skimming through a Twitter feed of all the people they follow, an eye-catching profile picture will help them pick your tweets out. It could be your face, if you have a good, clear shot of your face (useful in identifying you when you meet followers at face-to-face events). It could also be an abstract image which somehow reflects your @name. Make sure the image is clear enough, as it appear as a small icon. Don’t leave your profile picture as the default Twitter ‘egg’ or ‘profile head’ – this suggests that you are either very new to Twitter or a spammer! You can also add a ‘Header’ image which customises your profile page a little more.
-
Add your real name, if you wish. This will appear on your profile, so if you use a pseudonym and abstract picture, your Twitter account can still be identifiably ‘you’. If you are using Twitter to represent a module, course or department then the full version of its title would be something to add here.
-
Add a location. Your followers might be from anywhere in the country or the world, so this gives people a bit more context about which university you are affiliated with.
-
Add a URL to a personal website or webpage. People can then find out more about you than is possible in your Twitter profile.
-
Add a ‘bio’. You have 160 characters to sum up who you are and what you might be tweeting about, to give people a reason to follow you. A blank or minimal bio isn’t very inviting, and suggests that you are too new to be interesting, that there is little to be gained from following you, or you are a spam account. A well-thought out bio is an important part of gaining new followers. Why not have a look at the bios on other tweeters’ profiles, and see what you find inviting or off-putting? If you intend to tweet in a professional capacity, it’s best to avoid too much about your hobbies and family or quirky, cryptic statements about yourself. Be aware of the public nature of the medium and conscious of your digital footprint at all times.
-
You can connect your Twitter account to post automatically to your Facebook account too, if you have one. Think carefully about the two audiences for Facebook and Twitter- is this something you want to do? Or would you rather keep them separate?
-
People will often view your profile page when deciding whether to follow you, and you might give out the URL to your profile page e.g. on your email signature or business card if you want to ask someone to follow you, so it is worth making it informative and distinctive. Today we’re mostly looking at the information in the tab at the top labelled ‘Me’, which is where people will find your profile:

Explore customising your Twitter profile page in the Settings.
Click on the cog icon at the top, and select Settings. In the Settings, you can:
-
Change your Header image – the one that sits behind your avatar. Go to Profile to upload an image.
-
Change the Background of the whole page under Design, using one of the pre-made themes or design and upload your own.

You can create more Twitter accounts, associated with different email accounts, if you wish. These might be for other facets of your online life, such as personal contacts, or to represent your research interests. It’s best not to mix audiences too much – for example, if you use Twitter for a hobby, then a separate account for professional purposes means that you aren’t filling people’s Twitter feeds with things that don’t interest them. It’s fine to add a personal touch to your professional tweets though!
Now, to let us know how you’re getting on, why not fill in this very short form with your Twitter handle and a link to the URL of your profile? Or if you have any other comments or questions, let us know.
So you have an account on Twitter now, with an engaging profile which invites others to follow your tweets. That’s enough for day one and you’re already halfway to earning your first CamDot badge!
CamDoT is adapted from Ten Days of Twitter for Learning Developers by Helen Webster which is licensed under aCreative Commons Attribution-NonCommercial-ShareAlike 3.0 Unported License.
This work is licensed under a Creative Commons Attribution-NonCommercial-ShareAlike 4.0 International License.
